Monday, January 10, 2022

 January 10, 2022

Just got this new collection from Ilonka Designs.   Used some photos from a few years ago when the girls were here for Christmas.


"It's Cold Outside" is the title of this collection by Ilonka's Designs. It's designed in soft and earthy tones and contains gorgeous Winter flowers. This collection is on sale with 30% off until January 23 and there is also a freebie that you can download at Ilonka's website. 
https://www.digitalscrapbookingstudio.com/ilonkas-designs 
https://store.gingerscraps.net/Ilonkas-Designs/ 
Freebie at: https://ilonkasdesigns.com #ilonkasdesigns #digitalscrapbooking #scrapbooking


Tuesday, December 7, 2021

 December 7, 2021

With all the new Christmas kits coming out, I'm working on last year's photo's. 

Ilonka's newest collection, All I want for Christmas, is awesome!   The traditional red and green with the blue make it so versatile! 


Christmas is a time to spend with your loved ones, to have Christmas dinner with family and friends and a time for giving. This collection by Ilonka's Designs is all about the last, giving. It's full with presents that you could give or get on Christmas Morning, so perfect to scrap your Christmas Morning pictures.

Merry Christmas!

This collection is on sale with 30% off until December 21.

https://www.digitalscrapbookingstudio.com/ilonkas-designs

https://store.gingerscraps.net/Ilonkas-Designs/


#ilonkasdesigns #ctilonkasdesigns #alliwantforchristmas #thestudio #digitalscrapbookingstudio #gingerscraps #digitalscrapbooking #scrapbooking


Friday, January 15, 2016

Picture Perfect Photo Cuts for those Uniquely Shaped Frames in PSE

1.  Open Photoshop Elements.  Screen prints and instructions are for PSE 14, but it will work with any version.  You just may need to look around for the tools...some of them have moved over the years.    Next open a photo, an odd shaped frame and any paper.  This will also work for plain old square frames, but the rectangle selection tool is faster!  For this challenge I'm using Indigo's Then and Now kit which is available in the Pixel Club.   If you don't have this beautiful kit, grab the freebie heart here so you can follow along.   Any light colored paper will work for this tutorial.  I chose the Heart Frame since this is the month of love! 

2.  Using the Move tool, drag and drop your photo onto the paper, then drag and drop the frame on top of the photo.   If your photos are really large you probably need to resize them first so that they are somewhere in the ball park of what you want to frame.  Close the photo and Heart PNG file.   Resize and rotate your photo and the frame to your satisfaction.  Your workspace should look something like this.


3.  Click on the Select Tool along the left side tool bar.   My PSE currently shows the Magic Wand, but your PSE will show the last tool in the set that you used.  There are four tools in the set.  Look at the bottom of your screen to see these four tools.  If it isn't already selected, click on the Magic Wand, the one that looks like Tinkerbelle's wand!   Be sure you have the heart layer selected on your page.  The one with the dark blue background is the one currently selected.


4.   Now, make sure Contiguous is checked along that bottom tool bar and then, using the magic wand,  click anywhere inside the frame.  You will see the "marching ants" walking around the inside of the frame.  If you also see ants walking around the edge of the paper, you probably don't have Contiguous checked.  Press ESC to get rid of all the ants, check Contiguous and click inside the frame again.


5.  We now have a selection the perfect shape for the frame.   It's a good idea to make it a little larger, so the frame slightly overlaps the photo.  So press SELECT on the top menu.  That will bring up a drop down menu (which unfortunately doesn't get picked up by the screen capture).  Select MODIFY then EXPAND.  Key in a number (I usually uses 10-50 depending on the thickness of the frame.  Bigger allows more flexibility if you change your mind about the size, but if you go too big it will extend past the frame.  If you are using the freebie heart frame, 20 works perfectly.  If you are using the same heart I am, you can go 50.  If you are using something really small, like stitches for a frame, you may need to use 1-3.  Press OK.


6.  Now you have the marching ants in a shape that is slightly bigger than the frame opening.  Switch to the photo layer and press CNTL/J.   This is the copy layer command, but since you have an active selection, it only copies the selection.   You should see your heart shaped photo in a new layer.   the copy layer selection automatically turns off the selection (marching ants). 
Next go to the full photo layer and turn off the visibility by clicking on the little eye.  You have a photo cut perfectly for the frame!  If you change your mind about how the photo fits the frame, delete the cut layer, turn the full photo layer visibility back on (re=click the eye) and go back up to step 3.


7. If you are happy with your results, it's a good idea to link the layers so the photo and frame don't accidentally get separated.  Holding down the CNTL key select each of the three layers to be linked and then click on the little paper clip inside any one  of them.  You will see all three paper clips turn yellow, which means if you move one, you move them all.


8. Now it's time to finish up the page.   Here's my final layout using elements from Indigo's Then and Now.   Happy Valentines!!!


Can't wait to see your wonderful layouts using this technique!!!

Wednesday, January 6, 2016

1.  Open PSE 14.  Then open a frame and a paper.  Drag and drop the frame anywhere on the paper.


2.  Click on the Magic Wand along the left side tool bar.   There are four tools in the set.  Look at the bottom of your screen to see the four tools.  If it isn't already selected, click on the one that looks like Tinkerbelle's wand!


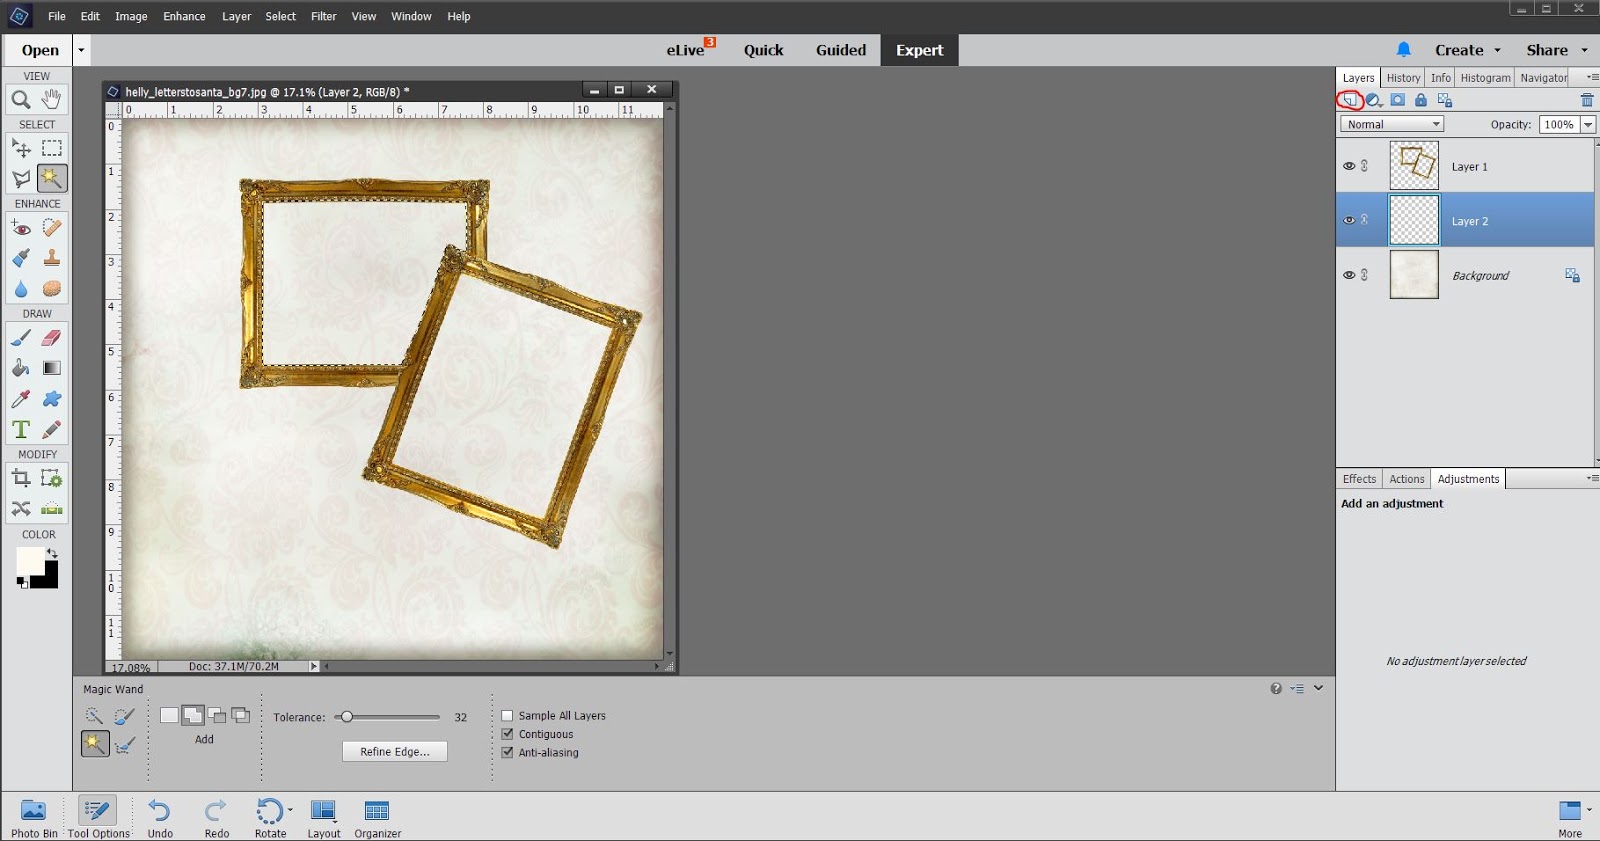
3.   Be sure you are on the frame layer and make sure contiguous is checked along that bottom tool bar and then click anywhere inside one of the frames.  You will see the "marching ants" walking around the inside of the frame.


4.  We now have a selection the perfect shape for the frame.   It's a good idea to make it a little larger, so press SELECT on the top menu.  That will bring up a drop down menu.  Select Modify then Expand.  Key in a number (I usually uses 10-20 depending on the thickness of the frame.  Press OK.


5.  Now you have the marching ants in a shape that is slightly bigger than the frame opening.  Now we need a new layer under the frame.   Up above the layers box, there are some icons.  The first one is the "new layer".    Click on that while holding down the CNTL key.   The CNTL key tells it to add the new layer under the current one.  Otherwise it adds one above.  If you do that, you can drag it down below the frame.  It should look like this...still with the marching ants.


6. Now we are going to create a perfect photo mask for the frame.   With the blank layer selected, go the top menu and press EDIT and FILL SELECTION from the dropdown menu.   when the fill layer box comes up select WHITE and press OK.


7.  You now have a photo mask...one of the most useful tools in PSE for scrappers.  Press CNTL/D to get rid of the marching ants.  You are done with the first frame.  Select the frames layer and do the preceding steps again for the second frame.  Don't forget the CNTL/D at the end to get rid of the marching ants.   Layout should look like this:


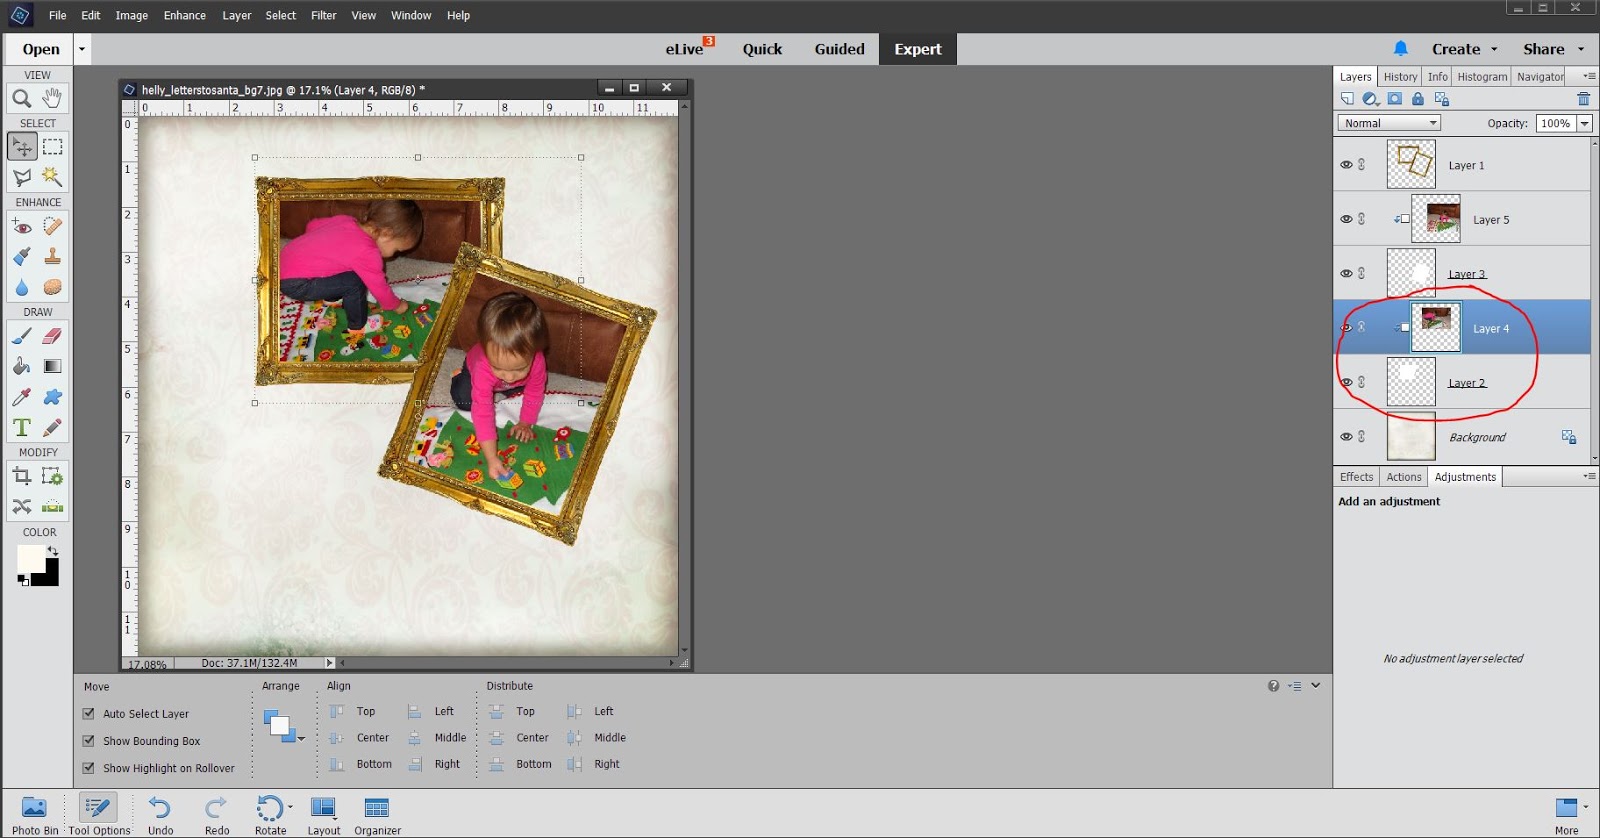
8.  Open two photos for the frame and drag and drop them onto the paper.  Each photo should be on the layer immediately above the mask that it will be using.   If that isn't where they are, drag the layers around till it looks like this.  Select one of the photo layers and size and rotate it to your liking by "grabbing" the corner bounding box.


9.  Once they are aligned and the right size (easy to adjust later), select one of the photo layers and press CNTL/G.  This will "clip" it to the mask layer and only the pixels that match the mask pixels are displayed.  The whole picture is still there and can still be resized and rotated.   Select the layer containing the second photo and Press CNTL/G to clip that photo.  You'll see the photo "indent" to indicate it's clipped to the layer below.


You now have a perfect fit!!!!   The best part about using the masks is that your photos are still there...no destructive clipping!

Thursday, January 22, 2015

Intro to Fusion Scrapping (AKA Confessions of a traditional Scrapper)

Intro to Fusion Scrapping (AKA Confessions of a traditional Scrapper)
Do you love what you see in Created by Jill's gorgeous Fusion kits, but just aren't sure how to use them?   We, I can relate!!!   I've been a Jill fan from way back when she was creating traditional kits.   I loved them.  Then she had the nerve to switch to fusion!   She didn't even ask me!!!   What the heck am I going to do with all those "messy" papers and elements?  I like things neat, orderly and color coordinated. 

To be perfectly honest, I resisted tlll she put out Beach Trip.   Still my favorite kit, I just couldn't resist and bought the whole bundle.  Now, what the heck was I going to do with it????

I have two outs for this problem...scraplifting and templates!   The templates I had were very traditional, so scraplifting it is.  I took a look at layouts that Jill's CT members made.   I found one that I loved and I thought would ease me into this new style.  Did I mention I'm not much for change?  Duh!  

Now I know that when you scraplift, you don't need to use the same kit, but I'm a newbie at fusion here, I need all the help I can get!  So I found a wonderful layout by NancyC that didn't look too "fusie" (I know that's not a word!!!)


I grabbed some of my own beach photos and literally made a carbon copy of the layout!   Hey, I moved the netting!


That's pretty cool!   I always do two page spreads so I thought I would make the next one a little less lift and a little more fuse....how tough could it be?  

I grabbed yet another page of Nancy's to lift and forged ahead. 


This time I put a little more Mary-Lynne and a little less Nancy into the layout and fell in love with fusion!   The best part is that you can't do it wrong!  It's suppose to look messy and grungy and overall awesome!!!  Here's mine!


Then Jill came out with the Color Pop collection and the Color me Happy collection and I totally hooked. 

But it just keeps getting funner!  Not too long ago, Jill starting creating Blendits templates.   OMG...Cheapest therapy session you will ever have.  They can sure be used with traditional kits, but they really shine with the fusion kits.   Too much fun for words!!!!   For a great look at how these work check out my PSE12 tutorial on Jill's blog.  Also using Beach Trip.  Did I mention I love that kit??? 

So now, my challenge to you, is to created a kit with any one of Jill's fusion kits.   Pick the kit and then pick one of the CT layouts to scraplift.   If you kick on the product in the store to get the full page description of the product, you can find the CT layouts just below the product.  Or use any one of the CT layouts regardless of kit.

Post your layouts here so we can all see your beautiful work!  And be sure to tell us the layout that you scraplifted so we can give them some love too!

Here's my Beach Trip layout with Blendits1


One last thing (and the most important thing)  THERE ARE NO RULES.  You don't even have to do a "fusion" style with a fusion kit.   Here are two layouts that I made using Jill's gorgeous Remember When Fusion Kit.   One Fusion, one traditional, same kit!  Have fun and Happy Scrapping!!!!